


Global warming has lead to unpredictable climates; researchers around the world are using weather stations to observe record and analyze weather patterns to study climate changes and provide weather forecasts. These Weather stations normally comprise of few sensors to measure environmental parameters and a monitoring or logging system to analyze these parameters. In this tutorial, we will learn how to build a wireless IoT-based weather station that can measure critical environmental parameters like Temperature, Humidity, and Pressure. Also since our weather station is IoT enabled, we can send these parameters to a ThingSpeak channel (IoT cloud) where we can store, analyze, and access the data remotely. We have also built a similar weather station using Raspberry Pi earlier, which is pretty much similar to this project.
We will be using the Arduino board along with the DHT11 sensor, BMP180 sensor, and an ESP8266 wifi module. The DHT11 sensor senses the temperature and humidity, while the BMP180 sensor calculates the pressure, and ESP8266 is used for internet connectivity. In our previous project, we already learned to use the DHT11 sensor to monitor temperature and humidity with Arduino, here in this project, we are adding another sensor (BMP180) to make a complete weather station using Arduino. Sending these data to ThingSpeak enables live monitoring from anywhere in the world and we can also view the logged data which will be stored on their website and even graph it over time to analyze it.
Components Required
- Arduino Uno
- ESP8266 Wi-Fi Shield
- DHT11 Sensor
- BMP180 Sensor
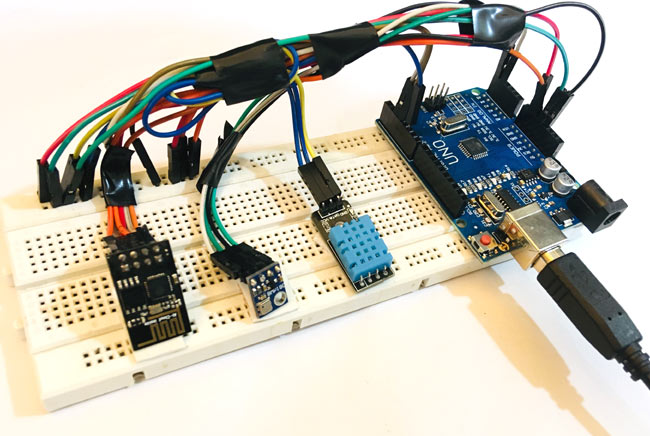
- Breadboard
- Jumper Wires
Circuit Diagram
The complete circuit for Arduino based IoT Weather Station is shown below.
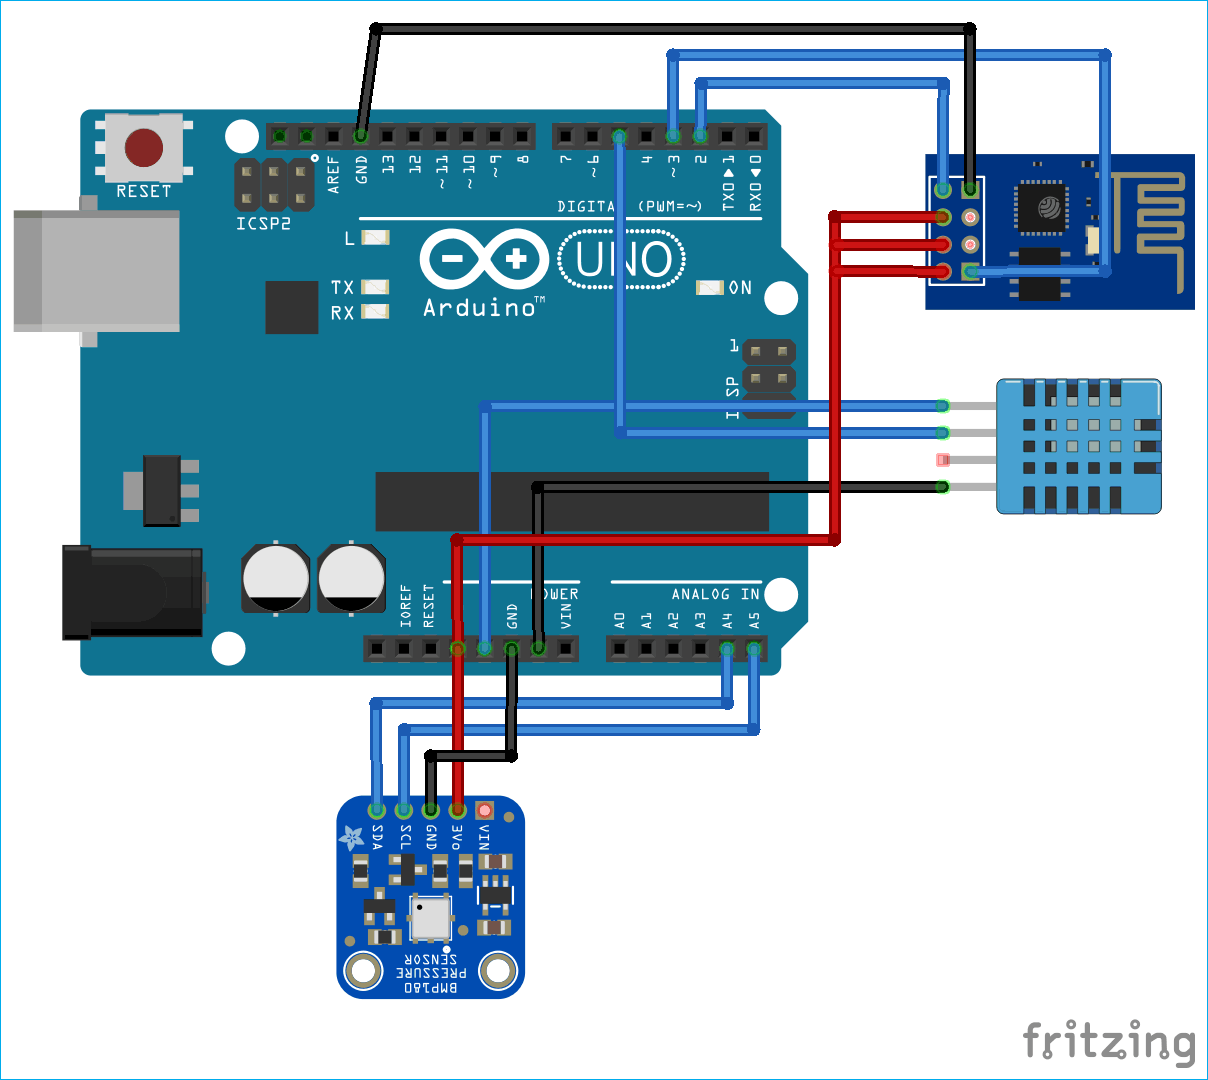
The DHT11 sensor is powered by the 5V pin of the Arduino and its data pin is connected to pin 5 for one-wire communication. The BMP180 sensor is powered by the 3.3V pin of Arduino and its data pins SCL (Serial Clock) and SDA (Serial Data) are connected to the A4 and A5 pin of Arduino for I2C communication.
The ESP8266 module is also powered by the 3.3V pin of the Arduino and its Tx and Rx pins are connected to Digital pins 2 and 3 of Arduino for serial communication. You can use the below table as a reference for making your connections.
|
S.NO. |
Pin Name |
Arduino Pin |
|
1 |
ESP8266 VCC |
3.3V |
|
2 |
ESP8266 RST |
3.3V |
|
3 |
ESP8266 CH-PD |
3.3V |
|
4 |
ESP8266 RX |
TX |
|
5 |
ESP8266 TX |
RX |
|
6 |
ESP8266 GND |
GND |
|
7 |
BMP180 VCC |
5V |
|
8 |
BMP180 GND |
GND |
|
9 |
BMP180 SDA |
A4 |
|
10 |
BMP180 SCL |
A5 |
|
11 |
DHT-11 VCC |
5V |
|
12 |
DHT-11 Data |
5 |
|
13 |
DHT-11 GND |
GND |
Setting up your ThingSpeak Channel
ThingSpeak is an open data platform that allows you to aggregate, visualize, and analyze live data in the cloud. You can control your devices using ThingSpeak, you can send data to ThingSpeak from your devices, and even you can create instant visualizations of live data, and send alerts using web services like Twitter and Twilio. ThingSpeak has integrated support from the numerical computing software MATLAB. MATLAB allows ThingSpeak users to write and execute MATLAB code to perform preprocessing, visualizations, and analyses. ThingSpeak takes a minimum of 15 seconds to update your readings. We have also done other interesting projects with ThingSpeak like-
- NodeMCU Temperature and Humidity Monitoring
- ESP32 Temperature and Humidity Monitoring
- Sending data to ThingSpeak could using Raspberry Pi
Step 1: ThingSpeak Account Setup
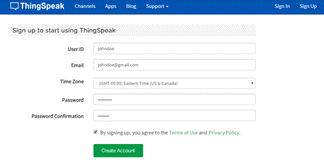
To create a channel on ThingSpeak, first, you need to Sign up on ThingSpeak. In case if you already have an account on ThingSpeak, sign in using your id and password.
For creating your account go to www.thinspeak.com.

Click on Sing up if you don’t have an account and if you already have an account, click on sign in. After clicking on signup, fill in your details.
After this, verify your E-mail id and click on continue.
Step 2: Create a Channel for Your Data
Once you Sign in after your account verification, Create a new channel by clicking the “New Channel” button.

After clicking on “New Channel,” enter the Name and Description of the data you want to upload on this channel.
Enter the name of your data ‘Humidity’ in Field1, ‘Temp’ in Field2, and ‘Pressure’ in Field3. If you want to use more Fields, you can check the box next to the Field option and enter the name and description of your data.
After this, click on the save channel button to save your details.
Step 3: API Key
To send data to ThingSpeak, we need a unique API key, which we will use later in our code to upload our sensor data to Thingspeak Website.
Click on the “API Keys” button to get your unique API key for uploading your sensor data.

Now copy your “Write API Key.” We will use this API key in our code.
Code Explanation
The programming part plays a very important role to perform all the operations in a project. As usual, complete code is given at the end. Start the code by including all the required libraries and defining all the variables.
#include <WiFi.h>
#include <DHT.h>
#include <Wire.h>
#include <SoftwareSerial.h>
#include <stdlib.h>
#include <SFE_BMP180.h>
After this, enter the Wi-Fi name, password of your Wi-Fi router, and then also enter the API key that you copied from the ThingSpeak channel.
#define ssid  "Enter Your WiFi Name Here "     // "WiFi Name"
#define pass "WiFi Password"       // "Password"
#define server = "api.thingspeak.com";
String apiKey ="Enter the API Key";
In the void setup() function, it connects with the Wi-Fi and starts the BMP180 and DHT11 sensors.
void setup() {
  Wire.begin();
  pressure.begin();
  // enable debug serial

  Serial.begin(9600);
       delay(10);
       dht.begin();

Serial.begin(9600);
  Serial.println("AT");
  delay(5000);
  if(Serial.find("OK")){
    connectWiFi();
Using the void Transmission() function, we calculate the temperature, humidity, and pressure using the BMP180 and DHT11 sensors.
void Trsmission()
{
  int8_t h = dht.readHumidity();
  int16_t t = dht.readTemperature(TEMPTYPE);
  char status;
  double T,P,p0,a;
  status = pressure.startTemperature();
  if (status != 0)
  {
    delay(status);
    status = pressure.getTemperature(T);
    if (status != 0)
    {

      status = pressure.startPressure(3);
      if (status != 0)
      {
        // Wait for the measurement to complete:
        delay(status);
………………………………………………………………..
………………………………………………………………..
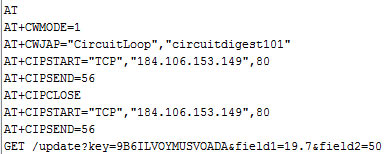
These commands are used to connect with the ThingSpeak server and then print the temperature, humidity, and pressure values in different fields.
String cmd = "AT+CIPSTART=\"TCP\",\"";
  cmd += "184.106.153.149"; // api.thingspeak.com
  cmd += "\",80";
  ser.println(cmd);

 if(ser.find("Error")){
    Serial.println("AT+CIPSTART error");
    return;
…………………………………….

  // prepare GET string
  String getStr = "GET /update?api_key=";
  getStr += apiKey;
  getStr +="&field1=";
  getStr += String(strTemp);
  getStr +="&field2=";
  getStr += String(strHumid);
  getStr +="&field3=";
  getStr += String(strPres);
  getStr += "\r\n\r\n";
Running the IoT Arduino Weather Station
Now connect the Arduino with the laptop and choose the board and port correctly and then click the Upload button. After uploading the code, open the serial monitor. Make the baud rate of the serial monitor 9600. You will see your Wi-Fi Id, password, and temperature, humidity, and pressure values on the serial monitor.
Now navigate to the ThingSpeak channel and check your channel, you will see the temperature, humidity, and pressure values as shown in the below graphs.
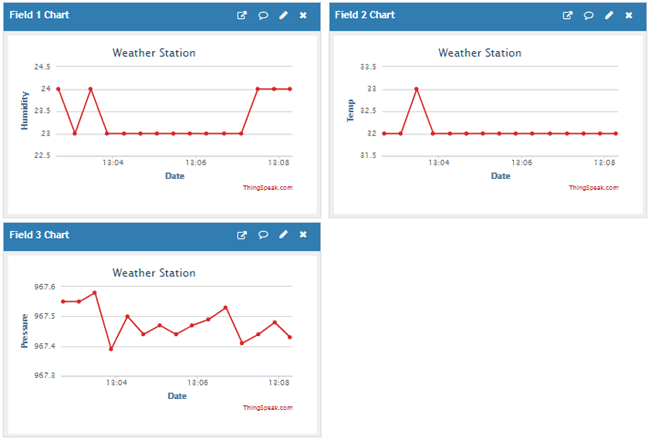
This is how you can build Arduino Weather Station where the temperature, humidity, and pressure can be monitored from anywhere in the world over the internet.
#include <WiFi.h>
#include <DHT.h>
#include <Wire.h>
#include <SoftwareSerial.h>
#include <stdlib.h>
#include <SFE_BMP180.h>
SFE_BMP180 pressure;
#define DHTPIN 5
#define DHTTYPE DHT11
DHT dht(DHTPIN, DHTTYPE);
#define TEMPTYPE 0
#define ALTITUDE 160 // Altitude from Bussero (MI) Italy
#define ssid "Enter Your WiFi Name Here " // "WiFi Name"
#define pass "WiFi Password" // "Password"
#define server = "api.thingspeak.com";
String apiKey ="Enter the API Key";
char buffer[10];
char t_buffer[10];
char h_buffer[10];
char P_buffer[10];
SoftwareSerial ser(2, 3); // RX, TX
void setup() {
Wire.begin();
pressure.begin();
// enable debug serial
Serial.begin(9600);
Serial.println("AT");
delay(5000);
if(Serial.find("OK")){
connectWiFi();
}
void loop()
{
Trsmission(); // ESP8266
delay(60000); // 60 seconds
}
void Trsmission()
{
int8_t h = dht.readHumidity();
int16_t t = dht.readTemperature(TEMPTYPE);
char status;
double T,P,p0,a;
status = pressure.startTemperature();
if (status != 0)
{
delay(status);
status = pressure.getTemperature(T);
if (status != 0)
{
status = pressure.startPressure(3);
if (status != 0)
{
// Wait for the measurement to complete:
delay(status);
status = pressure.getPressure(P,T);
if (status != 0)
{
p0 = pressure.sealevel(P,ALTITUDE); // we're at 1655 meters (Boulder, CO)
a = pressure.altitude(P,p0);
}
else Serial.println("error retrieving pressure measurement\n");
}
else Serial.println("error starting pressure measurement\n");
}
else Serial.println("error retrieving temperature measurement\n");
}
float temp = t;
float humidity = h;
float Pression = p0;
String strTemp = dtostrf(temp, 4, 1, t_buffer);
String strHumid = dtostrf(humidity, 4, 1, h_buffer);
String strPres = dtostrf(Pression, 4, 2, P_buffer);
Serial.print("Temperature: ");
Serial.println(strTemp);
Serial.print("Humidity: ");
Serial.println(strHumid);
Serial.print("Pression: ");
Serial.println(strPres);
String cmd = "AT+CIPSTART=\"TCP\",\"";
cmd += "184.106.153.149"; // api.thingspeak.com
cmd += "\",80";
ser.println(cmd);
if(ser.find("Error")){
Serial.println("AT+CIPSTART error");
return;
}
if(ser.find("Error")){
Serial.println("AT+CIPSTART error");
return;
}
// prepare GET string
String getStr = "GET /update?api_key=";
getStr += apiKey;
getStr +="&field1=";
getStr += String(strTemp);
getStr +="&field2=";
getStr += String(strHumid);
getStr +="&field3=";
getStr += String(strPres);
getStr += "\r\n\r\n";
// send data length
cmd = "AT+CIPSEND=";
cmd += String(getStr.length());
ser.println(cmd);
//ser.print(getStr);
if(ser.find(">")){
ser.print(getStr);
}
else{
ser.println("AT+CIPCLOSE");
// alert user
Serial.println("AT+CIPCLOSE");
ser.println("AT+RST");
}
char buffer[10] = "";
}


