


In this tutorial, we will make an ESP32 based Weather station in which we will build an ESP32 Webserver to display temperature, humidity, pressure, luminosity, and altitude values on a web browser. Here DHT11 sensor is used to get the temperature and humidity data, BMP180 is used to get pressure and altitude data, and an LDR is used to get Luminosity data. This weather data can be monitored from anywhere in the world using the IP address of ESP32. It can also be uploaded to ThingSpeak to make it more interactive as we have done in Raspberry Pi weather station.
In IoT based applications, Webservers are used to control or monitor any sensor values using web browsers, we previously created many webservers using Arduino, ESP8266, NodeMCU, ESP32, Raspberry Pi, etc.
DHT11 Temperature and Humidity Sensor
The DHT11 sensor is very popular for measuring Temperature and humidity, and we previously used DHT11 to build weather stations with other microcontrollers like Arduino, Raspberry Pi, etc. It is industry calibrated and gives a digital output which makes it very easy to interface with all types of MCUs. It has only 3 pins (Data, Vcc, and GND) as shown in the picture below.
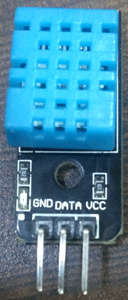
Check all the DHT11 based Projects here.
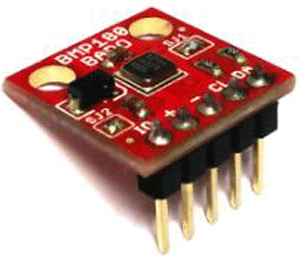
BMP180 Pressure Sensor
BMP180 is a barometric pressure sensor that is mainly used to measure altitude. It also has one inbuilt temperature sensor. It works with the I2C interface. BMP180 sensor measures the absolute pressure of the air around it. The pressure value depends on both the weather and altitude.
Components Required
- ESP32 Dev Module
- DHT11 Temperature and Humidity Sensor
- BMP180 Pressure Sensor
- LDR (Light Dependent Resistor)
- Resistors
- Breadboard
- Male-Female wires
ESP32 Wi-Fi Weather Station Circuit Diagram
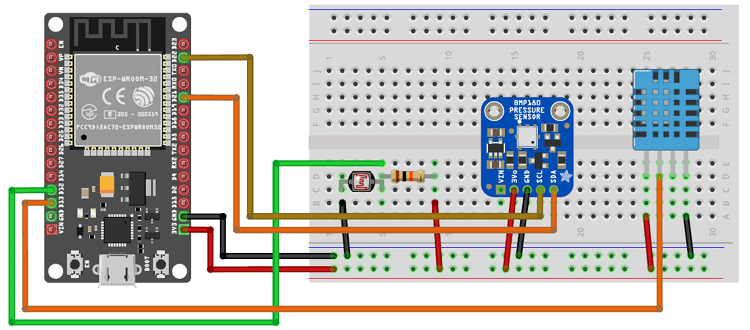
ESP32, DHT11 and BMP180 connections:
- Connect D22 pin(SCL) of ESP32 -> SCL pin of BMP180
- Connect D21 pin(SDA) of ESP32 -> SDA pin of BMP180
- Connect D13 pin of ESP32 -> Data pin of DHT11
- Connect D12 pin of ESP32 -> output of voltage divider
- Connect 3.3v pin of ESP32 -> Vcc of sensors
- Connect GND of ESP32 -> GND of sensors
Code Explanation
Here ESP32 is programmed with Arduino IDE and complete code with a demonstration Video is given at the end of the project.
We also need to have four libraries for this IoT based Weather station- WiFi, DHT (for DHT sensor), Adafruit_BMP085 (for BMP180), and Wire (for I2C).
Download these libraries from these links: DHT11 library, BMP180 and install them in Arduino IDE by going in Include library in the Sketch menu.
First, include all the required libraries.
#include <WiFi.h>
#include "DHT.h"
#include <Adafruit_BMP085.h>
#include <Wire.h>
Then, initialize variables and make instances for DHT11, BMP180, Wi-Fi name, Wi-Fi password, and some other variables used in the code.
#define DHTPIN 13
#define DHTTYPE DHT11
Adafruit_BMP085 bmp;
DHT dht(DHTPIN, DHTTYPE);
const char* ssid     = "********"; // Your ssid
const char* password = "*****"; // Your Password
Next, declare an object of the Wi-Fi library to access its functions. The argument for the instance formed will be the port number where the server is listening. Since 80 is the default port for HTTP, we will use this value.
WiFiServer server(80);
In Void setup() function, initialize the baud rate , DHT sensor and BMP180 using .begin() function then connect the module with the Wi-Fi using WiFi.begin(ssid, password); function.
void setup() {
Serial.begin(115200);
 delay(100);
  dht.begin();
   if (!bmp.begin()) {
 Serial.println("Could not find a valid BMP085 sensor, check wiring!");
..
WiFi.begin(ssid, password);
while (WiFi.status() != WL_CONNECTED) {
delay(500);
Serial.print(".");
}
..
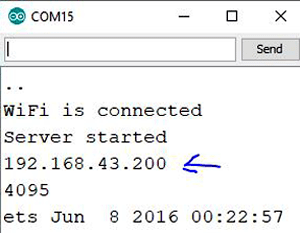
Now, start the servers using the server.begin(); function and print the IP address of ESP32. This IP address will be used to access weather data on the browser.
server.begin();
Serial.println("Server started");
Serial.println(WiFi.localIP());
}…
..
In void loop() function, get luminosity by reading the analog pin 12 where LDR is connected. Also, get the temperature in Celsius and Fahrenheit and store this data in different variables using dht.read() function. Then, get the altitude and pressure using the bmp.readPressure function. The pressure will be in millibar. Then, print this data on the serial monitor.
ESP32 has 12-bit ADC by default so, LDR readings will be from 0-4095, where 4095 is considered as max brightness and 0 as min brightness.
int ldrValue = analogRead(12);
Serial.println(ldrValue, DEC); // prints the value read
 float h = dht.readHumidity();
  float t = dht.readTemperature();
  float f = dht.readTemperature(true);
float p = bmp.readPressure()/100;
   Serial.print("Pressure = ");
    Serial.print(p);
    Serial.println(" mb");
     float a = bmp.readAltitude();
..
Next, design the web page using HTML and send each line using the client.println() function.
WiFiClient client = server.available();
client.println("HTTP/1.1 200 OK");
client.println("Content-Type: text/html");
client.println("Connection: close");  // the connection will be closed after completion of the response
client.println("Refresh: 10");  // update the page after 10 sec
To decorate the page, use CSS to style the text and background. You can change the properties in the below lines to change the color, font, and other styles.
client.println("<!DOCTYPE HTML>");
client.println("<html>");
client.println("<style>html { font-family: Fantasy; display: block; margin: 0px auto; text-align: center;color: #333333; background-color: #ccffb3;}");
Then create the division using <div> tag for each parameter i.e. Pressure, Temperature, Humidity, Altitude, and Luminosity. Also, define different properties for these parameters.
..
..
client.println("<div class=\"side_adjust text1\">Humidity:</div>");
client.println("<div class=\"side_adjust data1\">");
client.print(h);
client.println("<div class=\"side_adjust text1\">%</div>");
client.println("</div>");
Similarly, make the division class for other parameters and close the HTML and body tag.
client.println("</body>");
client.println("</html>");
Complete code with a Demo video can be found at the end of this tutorial.
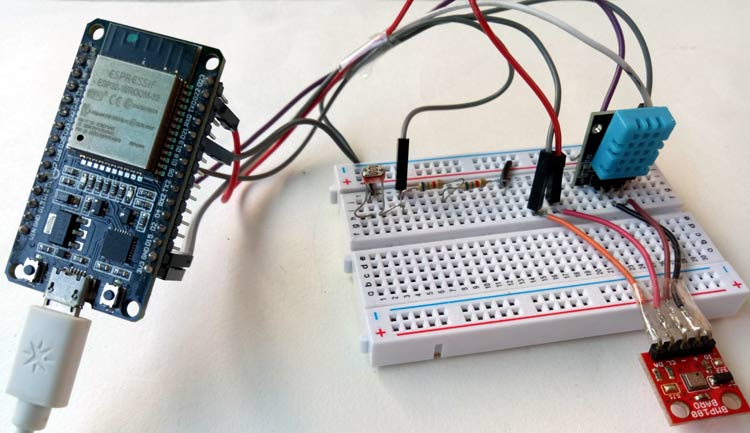
Testing the ESP32 Weather Station
Now, connect the ESP32 with the laptop and choose the board and port correctly and then hit the Upload button. Make sure your laptop or Smartphone share the same Wi-Fi network as the ESP32.
After uploading the code, open the serial monitor. Make the baud rate of serial monitor as 115200. You will see the IP address in the monitor, just copy this IP and paste it in the browser.
So open this IP address in the web browser by copy-pasting the IP address in the address bar, and you will see a webpage showing all the weather data like Temperature, Humidity, Pressure, Altitude, and Luminosity. This page will be refreshed automatically after every 10 seconds.
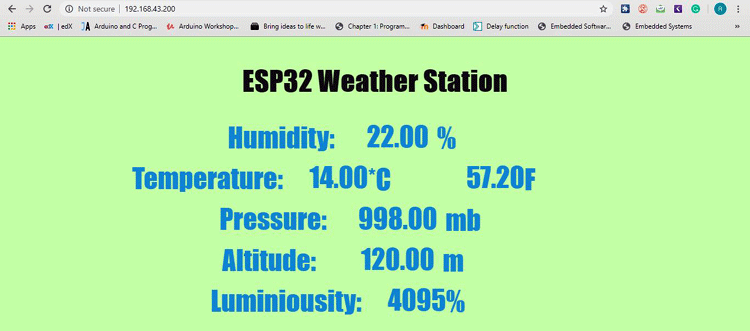
So, this is how you can easily build a complete weather station using ESP32, DHT11 and BMP180 sensor. This data can be monitored from anywhere in the world by enabling the port forwarding in your router settings.
#include <WiFi.h>
#include "DHT.h"
#include <Wire.h>
#include <Adafruit_BMP085.h>
#define DHTPIN 13
#define DHTTYPE DHT11
Adafruit_BMP085 bmp;
DHT dht(DHTPIN, DHTTYPE);
const char* ssid = "*******"; // Your ssid
const char* password = "********"; // Your Password
char status;
WiFiServer server(80);
void setup() {
Serial.begin(115200);
delay(100);
dht.begin();
if (!bmp.begin()) {
Serial.println("Could not find a valid BMP085 sensor, check wiring!");
while (1) {}
}
Serial.print("Connecting to ");
Serial.println(ssid);
WiFi.begin(ssid, password);
while (WiFi.status() != WL_CONNECTED) {
delay(500);
Serial.print(".");
}
Serial.println("");
Serial.println("WiFi is connected");
server.begin();
Serial.println("Server started");
Serial.println(WiFi.localIP());
}
void loop() {
int ldrValue = analogRead(12); // read analog input pin 0
Serial.println(ldrValue, DEC); // prints the value read
float h = dht.readHumidity();
// Read temperature as Celsius (the default)
float t = dht.readTemperature();
// Read temperature as Fahrenheit (isFahrenheit = true)
float f = dht.readTemperature(true);
// Check if any reads failed and exit early (to try again).
if (isnan(h) || isnan(t) || isnan(f)) {
Serial.println("Failed to read from DHT sensor!");
return;
}
float p = bmp.readPressure()/100;
Serial.print("Pressure = ");
Serial.print(p);
Serial.println(" mb");
// Calculate altitude assuming 'standard' barometric
// pressure of 1013.25 millibar = 101325 Pascal
float a = bmp.readAltitude();
Serial.print("Altitude = ");
Serial.print(a);
Serial.println(" meters");
Serial.print("Humidity: ");
Serial.print(h);
Serial.print(" %\t");
Serial.print("Temperature: ");
Serial.print(t);
Serial.print(" *C ");
Serial.print(f);
Serial.print(" *F\t");
WiFiClient client = server.available();
client.println("HTTP/1.1 200 OK");
client.println("Content-Type: text/html");
client.println("Connection: close"); // the connection will be closed after completion of the response
client.println("Refresh: 10"); // update the page after 10 sec
client.println();
client.println("<!DOCTYPE HTML>");
client.println("<html>");
client.println("<head>");
client.println("<style>html { font-family: Fantasy; display: block; margin: 0px auto; text-align: center;color: #333333; background-color: #ccffb3;}");
client.println("body{margin-top: 50px;}");
client.println("h1 {margin: 50px auto 30px; font-size: 50px; text-align: center;}");
client.println(".side_adjust{display: inline-block;vertical-align: middle;position: relative;}");
client.println(".text1{font-weight: 180; padding-left: 15px; font-size: 50px; width: 170px; text-align: left; color: #3498db;}");
client.println(".data1{font-weight: 180; padding-left: 80px; font-size: 50px;color: #3498db;}");
client.println(".text2{font-weight: 180; font-size: 50px; width: 170px; text-align: left; color: #3498db;}");
client.println(".data2{font-weight: 180; padding-left: 150px; font-size: 50px;color: #3498db;}");
client.println(".data{padding: 10px;}");
client.println("</style>");
client.println("</head>");
client.println("<body>");
client.println("<div id=\"webpage\">");
client.println("<h1>ESP32 Weather Station</h1>");
client.println("<div class=\"data\">");
client.println("<div class=\"side_adjust text1\">Humidity:</div>");
client.println("<div class=\"side_adjust data1\">");
client.print(h);
client.println("<div class=\"side_adjust text1\">%</div>");
client.println("</div>");
client.println("<div class=\"data\">");
client.println("<div class=\"side_adjust text2\">Temperature:</div>");
client.println("<div class=\"side_adjust data2\">");
client.print(t);
client.println("<div class=\"side_adjust text2\">*C</div>");
client.print(f);
client.println("<div class=\"side_adjust text2\">F</div>");
client.println("</div>");
client.println("<div class=\"data\">");
client.println("<div class=\"side_adjust text1\">Pressure:</div>");
client.println("<div class=\"side_adjust data1\">");
client.print(p);
client.println("<div class=\"side_adjust text1\">mb</div>");
client.println("</div>");
client.println("<div class=\"data\">");
client.println("<div class=\"side_adjust text1\">Altitude:</div>");
client.println("<div class=\"side_adjust data1\">");
client.print(a);
client.println("<div class=\"side_adjust text1\">m</div>");
client.println("</div>");
client.println("<div class=\"data\">");
client.println("<div class=\"side_adjust text2\">Luminiousity:</div>");
client.println("<div class=\"side_adjust data2\">");
client.print(ldrValue);
client.println("</div>");
client.println("</div>");
client.println("</body>");
client.println("</html>


