


There are various wireless communication technologies used in building IoT applications and RF (Radio Frequency) is one of them. nRF24L01 is a single-chip radio transceiver module that operates on 2.4 - 2.5 GHz (ISM band). This transceiver module consists of a fully integrated frequency synthesizer, a power amplifier, a crystal oscillator, a demodulator, a modulator, and Enhanced ShockBurs protocol engine. Output power, frequency channels, and protocol setup are easily programmable through an SPI interface.
The operating voltage range of this Transceiver module is 1.9V to 3.6V. It has Built-in Power Down and Standby modes that make it power-saving and easily realizable.
We previously used nRF24L01 with Arduino to build a Gesture controlled Robot, here we will simply interface nRF24L01 with Arduino Uno to send and receive temperature & humidity data wirelessly from the DHT11 sensor.
Arduino Uno doesn’t have any inbuilt wireless communication support like Bluetooth or Wi-Fi, but it can be easily interfaced with other Wi-Fi or wireless modules like LoRa, nRF, Bluetooth and can be used to build IoT based Applications. Here we have used Arduino with ESP8266, with LoRa, with 433 MHz RF Module, with nRF24L01 module and with Bluetooth to establish wireless communication for IoT projects. We have also built few IoT based Weather stations using the DHT11 sensor.
Components Required
- Arduino Uno (2)
- nRF24L01 (2)
- 16*2 LCD
- LCD I2C Module
- DHT11 Sensor
NRF24L01 Transceiver Module Circuit diagram
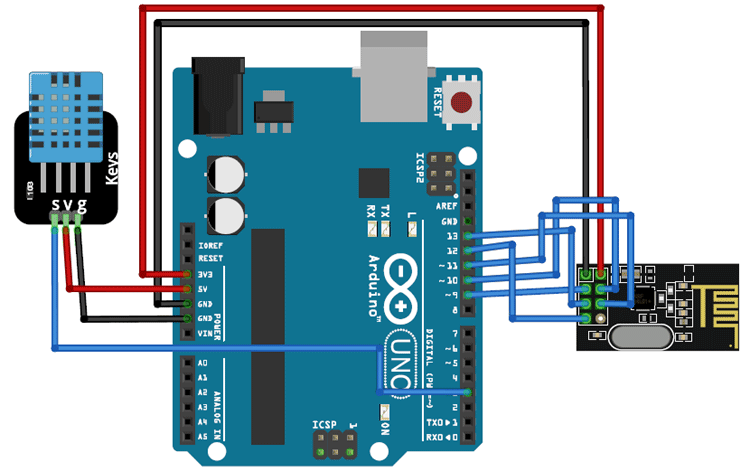
The circuit diagrams for Arduino nRF24L01 based transmitter and receiver are given below. Here, we are sending the temperature and humidity values wirelessly from one Arduino to another using the nRF24L01 module. To get the temperature and humidity values, we are using the DHT11 sensor that is connected to the transmitting side Arduino. Transmitting Arduino will get temperature and humidity values from DHT11 and then sends it to another Arduino via the nRF24L01 module. These humidity and temperature values will be displayed on 16*2 LCD connected to the receiver side, Arduino.
Interfacing nRF24L01 with Arduino UNO - Transmitting Side
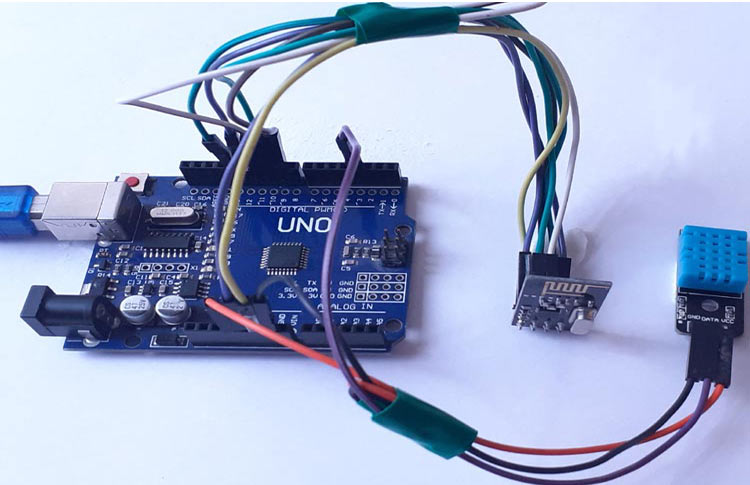
The transmitter side consists of an Arduino UNO, nRF24L01 module, and DHT11 sensor. Interfacing of the Arduino UNO with nRF24L01 and DHT11 is shown below. Arduino continuously gets data from the DHT11 sensor and sends it to the nRF24L01 Transmitter. Then the nRF transmitter transmits the data into the environment.
|
nRF24L01 |
Arduino Uno |
|
VCC |
3.3V |
|
GND |
GND |
|
CE |
Pin 9 |
|
CSN |
Pin10 |
|
SCK |
Pin 13 |
|
MOSI |
11 |
|
MISO |
12 |
|
DHT11 |
Arduino Uno |
|
VCC |
5V |
|
GND |
GND |
|
DATA |
3 |
Interfacing nRF24L01 with Arduino UNO - Receiving Side
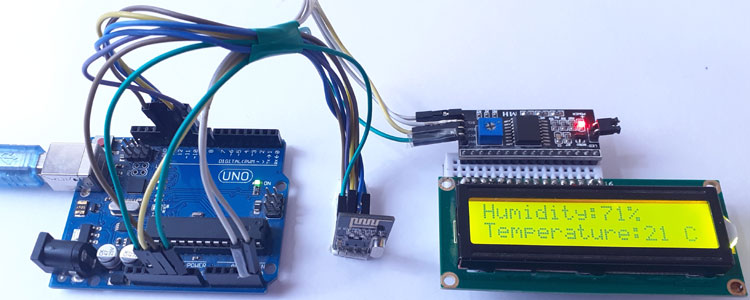
The receiver side consists of an Arduino UNO, nRF24L01 module, and 16*2 LCD module. The receiver side nRF module receives the data from the transmitter and sends it to Arduino. Interfacing of the Arduino with nRF24L01 and LCD module is shown below.

|
nRF24L01 |
Arduino Uno |
|
VCC |
3.3V |
|
GND |
GND |
|
CE |
Pin 9 |
|
CSN |
Pin10 |
|
SCK |
Pin 13 |
|
MOSI |
11 |
|
MISO |
12 |
|
LCD With I2C Module |
Arduino Uno |
|
VCC |
5V |
|
GND |
GND |
|
SCL |
A5 |
|
SDA |
A4 |
nRF24L01 with Arduino UNO Programming - Transmitter and Receiver Side
To use the nRF24L01 transceiver module with Arduino, first install the nRF24L01 library. Here two nRF24L01 modules are used as transmitter and receiver, so we have to write two separate codes for transmitter and receiver. Both the programs are the same except for the transmitting and receiving options. In the transmitter side program, the receiver option will be commented out, and in the receiver side program, the transmitter option will be commented out.
Check the complete program for nRF24L01 Arduino Uno Transmitter and Receiver have given at the end of this document.
First of all, including all the required library files. SPI library is used for SPI communication between nRF24L01 and Arduino, and the DHT11 library is used to calculate the temperature and humidity values.
#include <SPI.h>
#include <nRF24L01.h>
#include <RF24.h>
#include "DHT.h"
Then define the Radio pipe addresses for the communication and nRF transmitter’s CN and CSN pins.
const uint64_t pipeOut = 0xE8E8F0F0E1LL;
RF24 radio(9, 10);
After that, we declared temperature and humidity variables as a composite variable structure. In this program, h & t is used to send and receive data from the RF module.
struct MyData {
  byte h;
  byte t;
};
Inside the void setup function, we initialize the RF module data rate to a minimum of 250 Kbps.
void setup()
{
  Serial.begin(9600);
  dht.begin();
  radio.begin();
  radio.setAutoAck(false);
  radio.setDataRate(RF24_250KBPS);
  radio.openWritingPipe(pipeOut);
}
Inside the void loop function, read the temperature and humidity data from the DHT11 sensor and save this data into data.t and data.h variables.
data.h = dht.readHumidity();
data.t = dht.readTemperature();
Function radio.write reads the data and then puts it in a variable.
radio.write(&data, sizeof(MyData));
On the receiver side program, the void recvData function is used to receive the transmitted data.
void recvData()
{
  if ( radio.available() ) {
    radio.read(&data, sizeof(MyData));
    }
nRF24L01 Arduino Sender and Receiver Testing
Once the hardware and program are ready, upload both nRF24L01 transmitter and receiver codes in both Arduino modules. The transmitter module will send the temperature and humidity values to Receiver Module. And the receiver module will display it on its 16x2 LCD as shown below
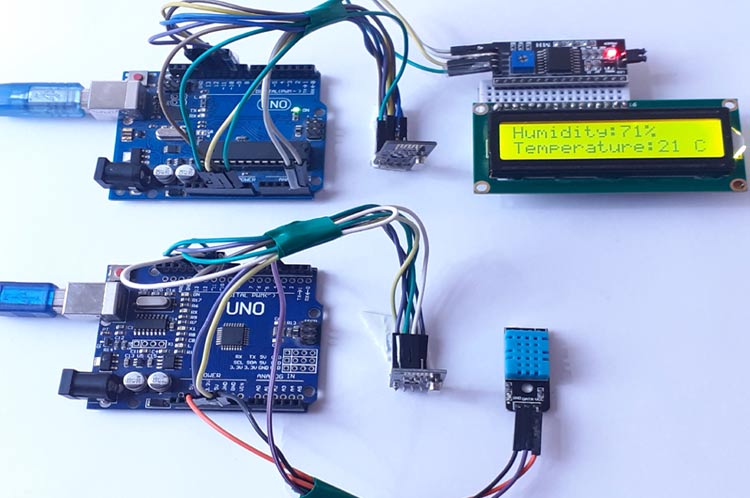
This is how you can use nRF24L01 as a wireless communication medium between two Arduinos. The complete working video of this project is given below.
Transmitter Side
#include <SPI.h>
#include <nRF24L01.h>
#include <RF24.h>
#include "DHT.h"
const uint64_t pipeOut = 0xE8E8F0F0E1LL;
#define DHTPIN 3
#define DHTTYPE DHT11
DHT dht(DHTPIN, DHTTYPE);
RF24 radio(9, 10); // CN and CSN pins of nrf
struct MyData {
byte h;
byte t;
};
MyData data;
void setup()
{
Serial.begin(9600);
dht.begin();
radio.begin();
radio.setAutoAck(false);
radio.setDataRate(RF24_250KBPS);
radio.openWritingPipe(pipeOut);
}
void loop()
{
data.h = dht.readHumidity();
data.t = dht.readTemperature();
if (isnan(data.h) || isnan(data.t)){
Serial.println(F("Failed to read from DHT sensor!"));
return;
}
Serial.print("Humidity: ");
Serial.print(data.h);
Serial.print("Temperature: ");
Serial.print(data.t);
radio.write(&data, sizeof(MyData));
}
Receiver Side
#include <SPI.h>
#include <nRF24L01.h>
#include <RF24.h>
#include <Wire.h>
#include <LiquidCrystal_I2C.h>
LiquidCrystal_I2C lcd(0x27, 16, 2);
const uint64_t pipeIn = 0xE8E8F0F0E1LL;
RF24 radio(9, 10);
struct MyData {
byte h;
byte t;
};
MyData data;
void setup()
{
Serial.begin(9600);
radio.begin();
lcd.begin();
lcd.home();
lcd.backlight();
lcd.clear();
radio.setAutoAck(false);
radio.setDataRate(RF24_250KBPS);
radio.openReadingPipe(1, pipeIn);
radio.startListening();
//lcd.println("Receiver ");
}
void recvData()
{
if ( radio.available() ) {
radio.read(&data, sizeof(MyData));
}
}
void loop()
{
recvData();
Serial.print("Humidity: ");
Serial.print(data.h);
lcd.setCursor(0,0);
lcd.print("Humidity:");
lcd.print(data.h);
lcd.print("%");
lcd.setCursor(0,1);
Serial.print("Temperature: ");
Serial.print(data.t);
lcd.print("Temperature:");
lcd.print(data.t);
lcd.print(" C");
//Serial.print("\n");
}


