


According to a report there will be over 20.4 Billion connected things worldwide by 2020. IoT platforms are the main facilitators in the growth of connected devices. To connect devices to the internet, they provide many integrated services and infrastructure like data storage, connectivity, display, control etc. Hence, they reduce the amount of work and investments required for deployment of IoT solutions and this is one of the main reasons behind some of the most successful IoT solutions around.
We are already familiar with some of the popular IoT platforms like ThingSpeak, Adafruit IO, Blynk etc. and already used these platforms to build many IoT projects. But apart from these platforms there are some industry grade IoT platforms like Amazon Web Services, Microsoft Azure and IBM Watson which are frequently used by big industries to store and analyse the data gathered from IoT devices. These platforms are more secure and offer many useful services, from getting data to analyse it using Machine learning algorithms.
Here in this tutorial we will learn about IBM Watson platform which is one of the best IoT platforms in terms of security and compatibility. IBM Watson or Bluemix is a cloud platform that supports many products and services such as Compute Infrastructure and Services, Internet of Things, Data Analytics, Mobile application services, Storage, etc. This platform is compatible with MQTT Protocol, HTTP and REST APIs. For the beginners it might be difficult to use this platform.
In this tutorial, we will setup IBM Watson Account and send the DHT11 Temperature and humidity data to it using ESP32 module. We will also visualize this data with the help of graphs. Previously we used ESP32 to build many IoT based applications, if you are new to ESP32 the start with getting started with ESP32 tutorial.
Materials Required
- ESP32 board
- DHT11 Temperature and Humidity Sensor
- Male-Female wires
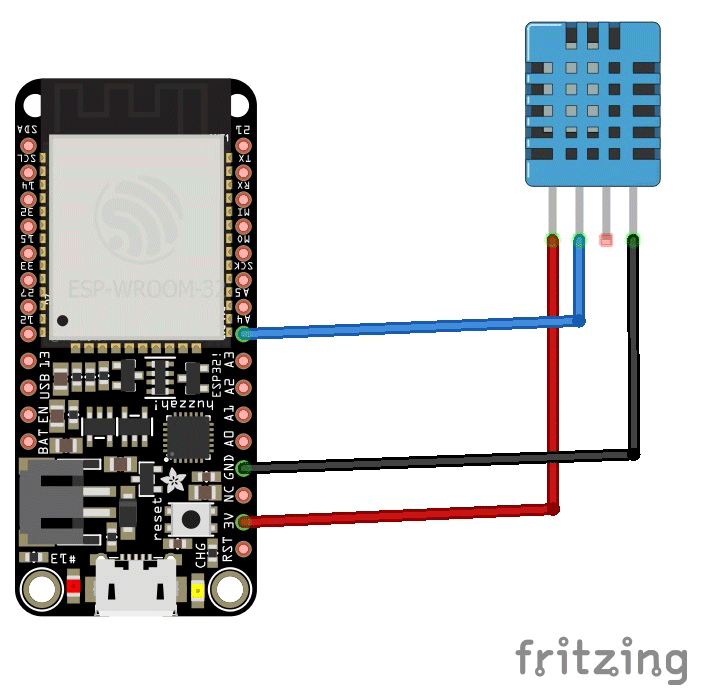
Circuit Diagram
Hardware only involves ESP32 and DHT11 sensor. Connect DHT11 signal pin to D4 and Vdd & GND pin of DHT11 to 3.3v & GND pin of ESP32 respectively.

We previously send DHT11 sensor data to many other IoT clouds to make weather station
- IoT based Temperature and Humidity Monitoring using BLYNK, ESP8266 and DHT11 Sensor
- IoT Based Raspberry Pi Weather Station using DHT11 and BMP180 Sensor
- Temperature and Humidity Monitoring over Cloud using Raspberry Pi and Cayenne
- Interface Arduino with Node-RED to monitor the Temperature and Humidity on a Webpage
- IoT Wireless Weather Station using Arduino, ESP8266 and ThingSpeak
Setup Account for IBM Watson IoT Platform
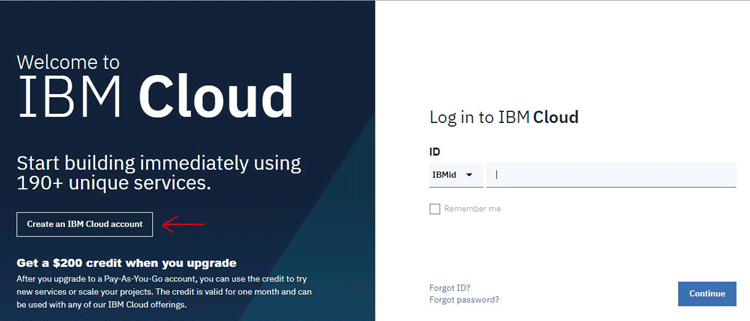
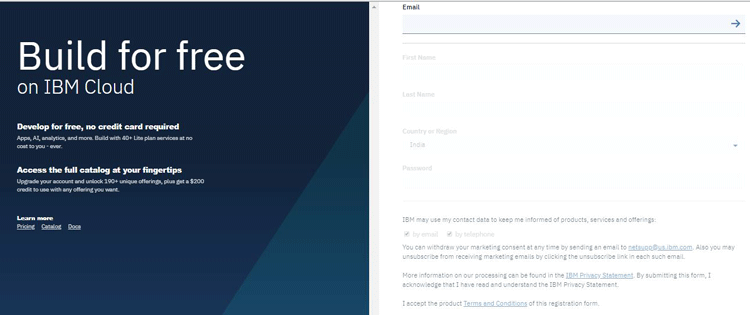
1. To create an account on IBM Watson platform, Go to on IBM cloud page and click on Create an IBM Account. Enter your Details and Click on Create Account as shown below.
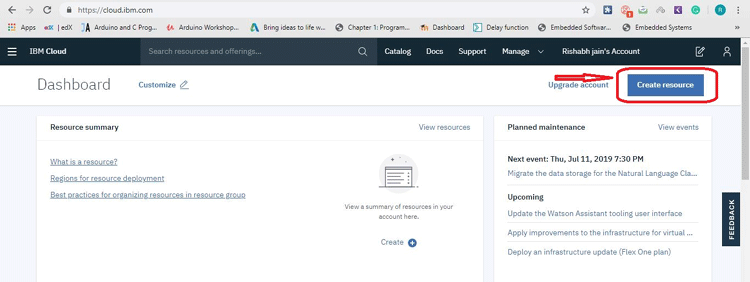
2. To use any service on IBM platform we have to create resource for it. So, Login with your credentials (Note that IBMid is your e-mail id that you have used for creating account) and you will be redirected to IBM cloud website. Now, click on Create Resource.
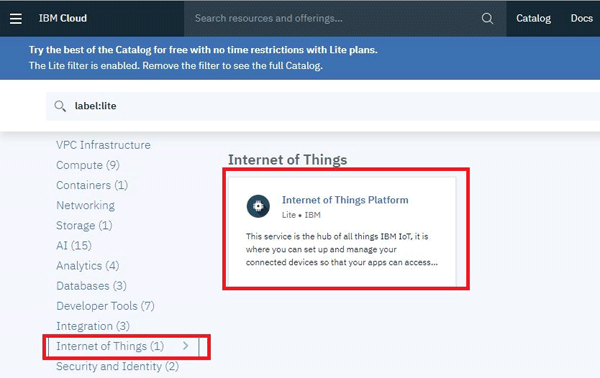
3. There are many services offered by IBM Cloud, all of them can be seen in Resource list. As we want to use Internet of Things service. So, click on Internet of Things and then click on Internet of Things Platform.
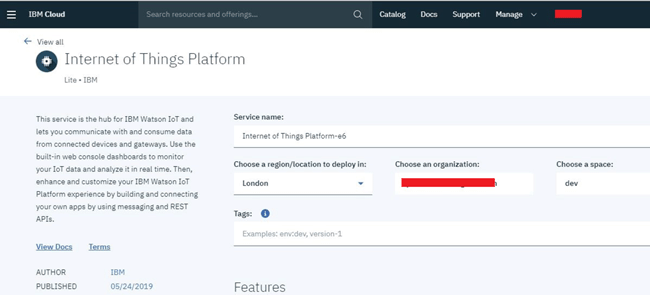
4. On next page there are some pre-filled information, leave that information as it is and click on Create.
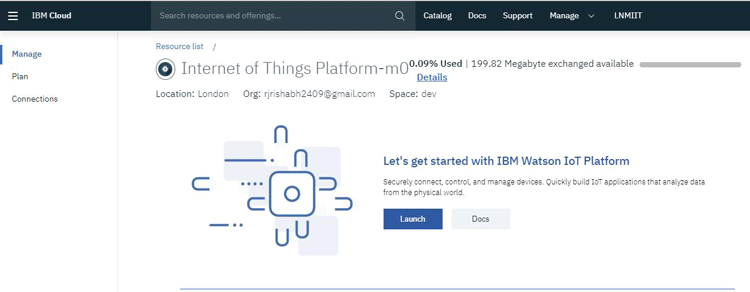
5. Now we are ready with the IoT resource. Launch the created resource by clicking on Launch.
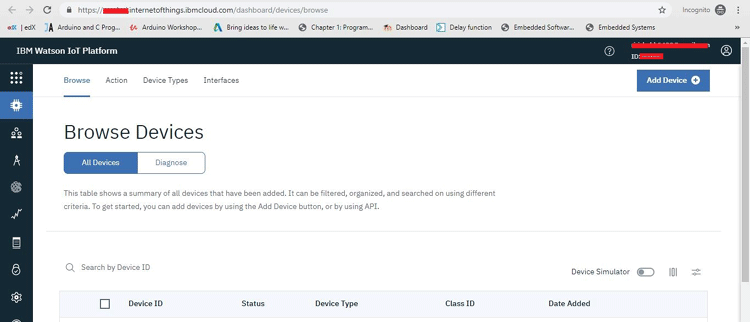
6. Now, you will be redirected to Internet of things page. Here, add your device to connect it with the IoT platform. Click on Add device.
7. Fill the Device details on next page. Give name in Device Type and Device ID will be MAC address of that device. You can find MAC address of ESP32 using the below code
uint64_t chipid;
void setup() {
 Serial.begin(115200);
}

void loop() {
 chipid=ESP.getEfuseMac();
Serial.printf("ESP32 Chip ID = %04X",(uint16_t)(chipid>>32));
 Serial.printf("%08X\n",(uint32_t)chipid)
 delay(3000);
}
MAC address will be print on the Serial monitor, copy that number and paste in Device ID. Click on Next.

8. On next page, there is some information related to device. Leave that information unfilled and click on next. Same for Security section, leave it unfilled and click on next as shown.
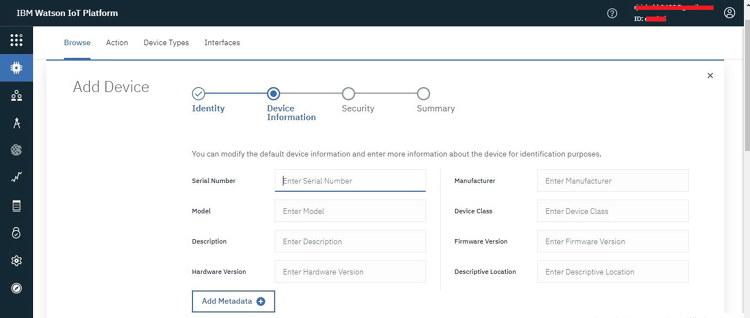
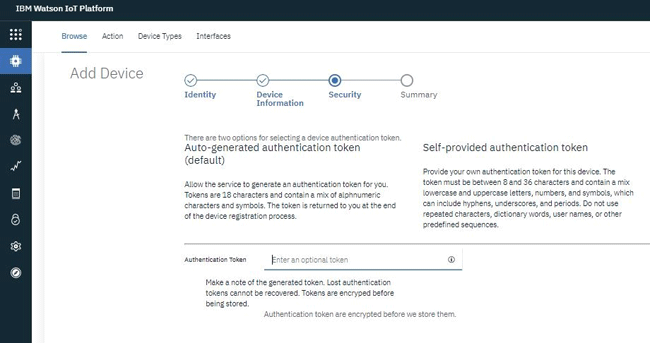
9. On last page as Summary, click on Finish.

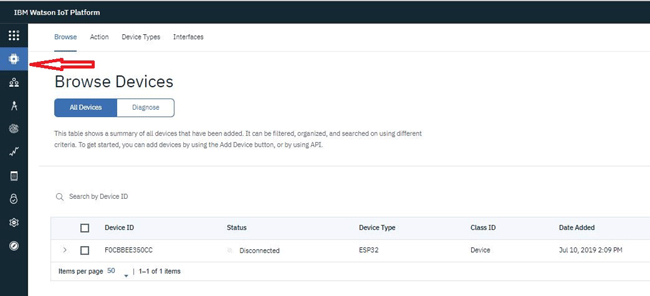
10. Now, we have successfully created the device, and Device credentials will be shown on next page. Copy all the credentials and save it somewhere. They will be needed in the code.

11. Click on Devices and here you will see ESP32 is successfully created but it is not connected. Now, we will connect the ESP32 with this platform by writing code for it.
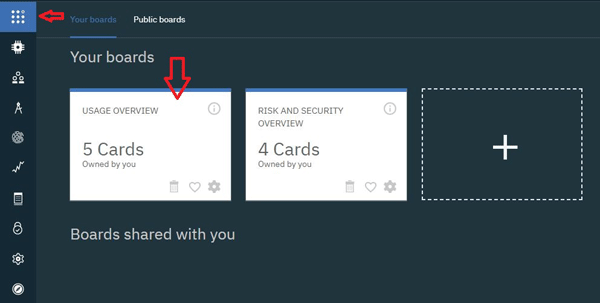
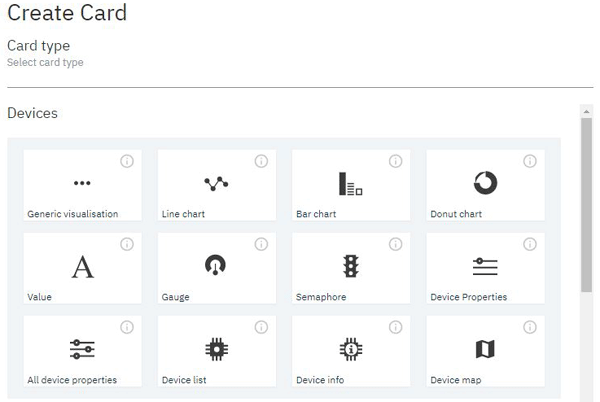
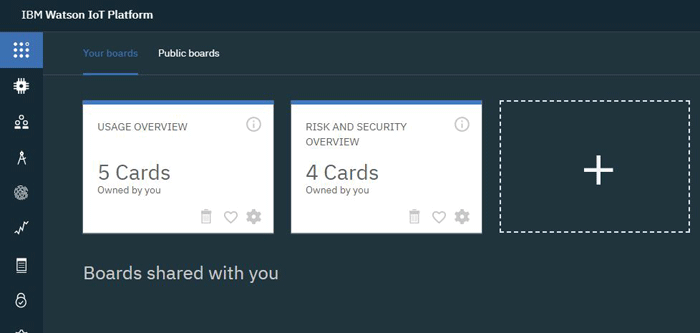
12. To display Temperature and Humidity in Graph format, create a template by going into Devices and click on Usage Overview Board.
13. Now, click on Add New Card. Here you will find different type of graphs to display. We will use Line chart graph so go ahead and click on Line chart.
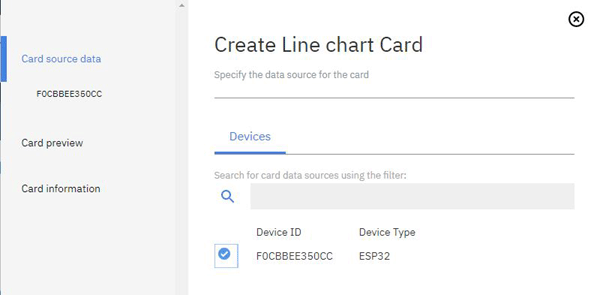
14. Select device that we have created previously and click on Next. On next page Click on Connect new data set.

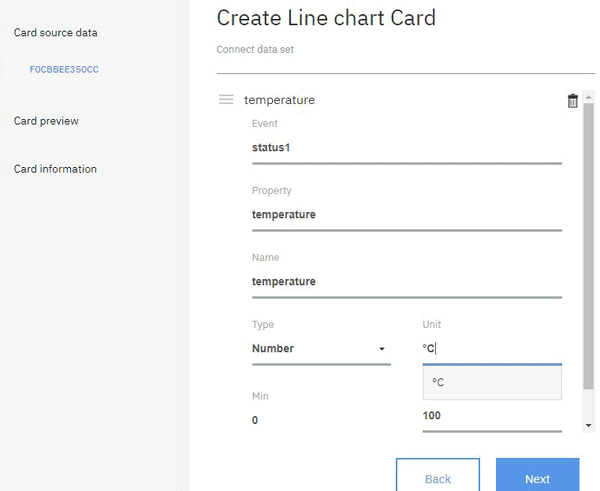
15. Now, enter the data to be displayed on the graph. We will send the temperature value on status1 event (status1 variable is mentioned in the code). Give property and name as temperature, type as Number, Unit as degree Celsius and click on Next.
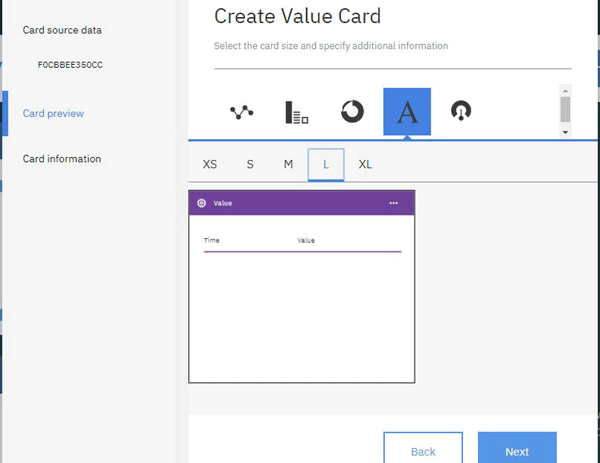
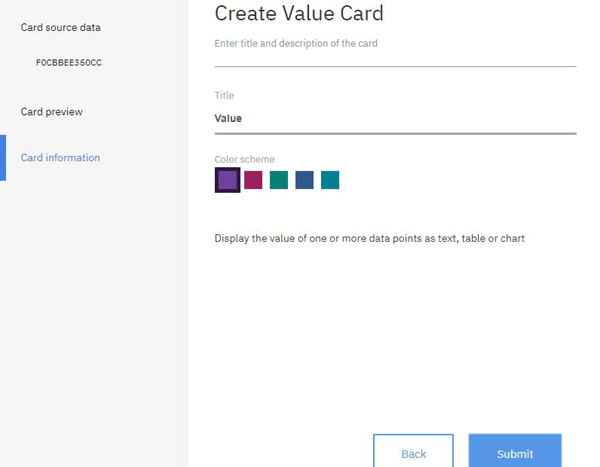
16. Choose the Graph size and click on Next then on next page choose color for graph and click on Submit.
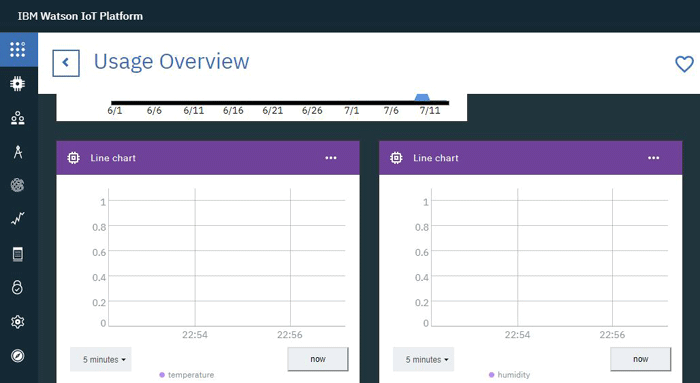
17. Now, you will see a graph as shown below. Repeat above steps for making another graph for humidity and give event as status2, property and name as humidity, value as Number and unit as %.
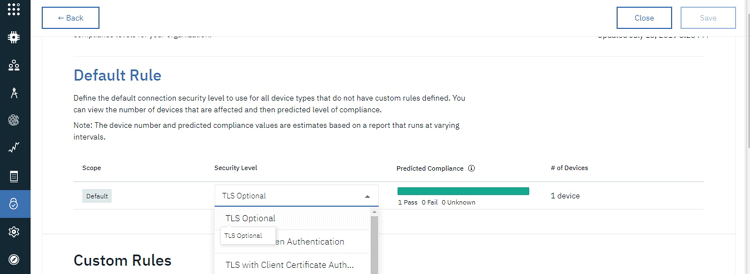
18. To enable the communication between IBM cloud and ESP32. Go to security option and click on Connection Security.

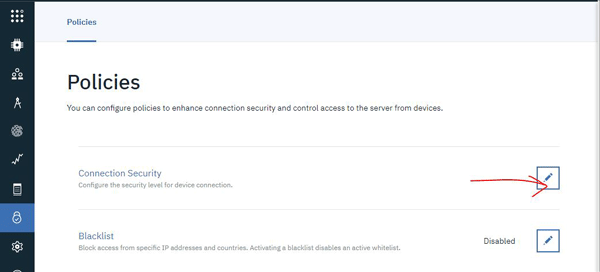
19. Under Default Rule, Choose security level as TLS optional and click on Save.
That’s it. We have successfully setup IBM Watson IoT platform for ESP32. Now, we have to write code for sending value of temperature and humidity to this platform.
Code and Explanation
Before proceeding further, make sure you have installed ESP32 board files if you don’t have board files follow our previous tutorials on ESP32 to know how to install board files.
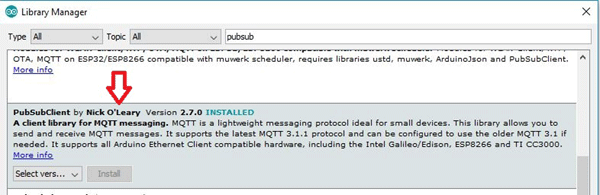
Now, install libraries for DHT sensor and PubSub client. Go to sketch -> Include Library -> Manage libraries. Then search for DHT and PubSubClient libraries and then install it.

Complete code with a working video is given at the end of this tutorial, here we are explaining the complete program to understand the working of the project.
First, include libraries for Wi-Fi, PubSubClient and DHT. As we are using MQTT protocol to send and receive messages thats why we need PubSubClient. This library use MQTT protocol to subscribe and publish data.
#include <WiFi.h>
#include <WiFiClient.h>
#include <PubSubClient.h>
#include "DHT.h"
Define some variables for dhtpin and type of DHT sensor. Also, we need to define all the credentials that you have copied while adding a device on Watson platform as shown below.
#define DHTPIN 4
#define DHTTYPE DHT11
#define ORG "******"
#define DEVICE_TYPE "ESP32"
#define DEVICE_ID "***********"
#define TOKEN "********"
Add Wi-Fi credentials in a char variable as SSID and password.
const char* ssid = "*******";
const char* password = "**********";
Now, provide link on which we will publish the data. Also, provide topics on which we will publish data. We have 2 topics, 1 for temperature and other for humidity and give name as status1 and status2 respectively. Give Auth method as “use-token-auth” and then define clientID as shown below.
char server[] = ORG ".messaging.internetofthings.ibmcloud.com";
char pubTopic1[] = "iot-2/evt/status1/fmt/json";
char pubTopic2[] = "iot-2/evt/status2/fmt/json";
char authMethod[] = "use-token-auth";
char clientId[] = "d:" ORG ":" DEVICE_TYPE ":" DEVICE_ID;
In void Setup function, initialize serial monitor, DHT sensor and Wi-Fi using .begin() function. Then connect the module with the Wi-Fi. After connection is established connect the module with IBM Watson platform using the given credentials.
void setup() {
    Serial.begin(115200);
    dht.begin();
    WiFi.begin(ssid, password);
..
    while (WiFi.status() != WL_CONNECTED) {
      delay(500);
      Serial.print(".");
    }
..
..
    if (!client.connected()) {
 Serial.println(server);
        while (!client.connect(clientId, authMethod, token)) {
  Serial.print(".");
            delay(500);
..
}
In void loop function, take temperature and humidity data from DHT sensor and store in two different variables. Then send this payload as String. We have to make two strings, one for temperature and other for humidity and send this data after every second.
void loop() {
    client.loop();
    long now = millis();
   if (now - lastMsg > 3000) {
        lastMsg = now;
float humidity = dht.readHumidity();
    float temperature = dht.readTemperature();
String payload = "{\"d\":{\"Name\":\"" DEVICE_ID "\"";
payload += ",\"temperature\":";
payload += temperature;
payload += "}}";
Similarly, make a string for humidity.
Now we have done with the coding part. You can find complete code with demonstration video at the end of this tutorial.
Uploading the data from ESP32 to IBM Watson IoT cloud
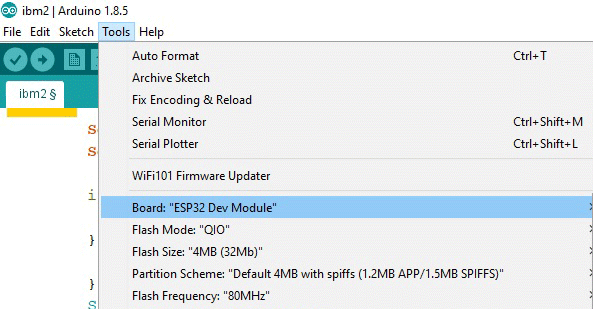
Finally connect the DHT sensor with digital pin 4 as shown in connection diagram and upload the code by selecting ESP32 Dev module in tools menu.
Checking Uploaded Data on IBM Watson
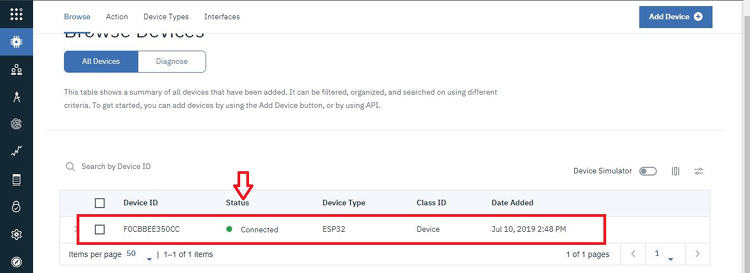
Now, its time to check the uploaded data on the IBM Watson platform. As soon as your module is connected with the Wi-Fi, you will see connected status on IBM Watson platform as shown below.
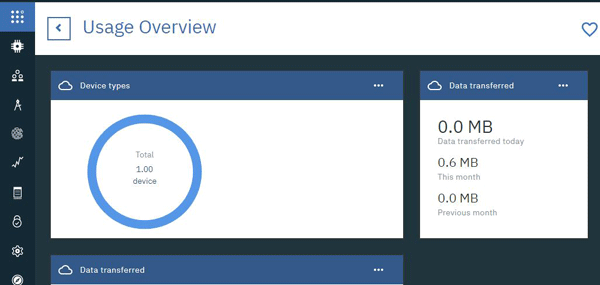
1. Go to Boards and click on Usage Overview option.
2. There are two graphs here that are created to see the value of temperature and humidity updating after every second as shown below.
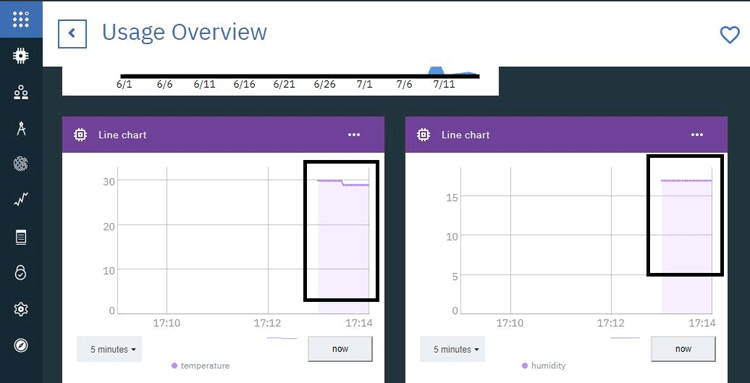
3. Values can be seen in different format like chart form or Gauge meter by selecting the proper options in the dashboard.

There are lots of other features to explore with IBM Watson platform. So this is how ESP32 can be used to send the data to IBM Watson cloud platform
Check the complete ESP32 code and Video below.
#include <WiFi.h>
#include <WiFiClient.h>
#include <PubSubClient.h>
#include "DHT.h"
const char* ssid = "*******";
const char* password = "********";
#define DHTPIN 4
#define DHTTYPE DHT11
#define ORG "******"
#define DEVICE_TYPE "ESP32"
#define DEVICE_ID "**********"
#define TOKEN "**********"
char server[] = ORG ".messaging.internetofthings.ibmcloud.com";
char pubTopic1[] = "iot-2/evt/status1/fmt/json";
char pubTopic2[] = "iot-2/evt/status2/fmt/json";
char authMethod[] = "use-token-auth";
char token[] = TOKEN;
char clientId[] = "d:" ORG ":" DEVICE_TYPE ":" DEVICE_ID;
WiFiClient wifiClient;
PubSubClient client(server, 1883, NULL, wifiClient);
DHT dht(DHTPIN, DHTTYPE);
void setup() {
Serial.begin(115200);
dht.begin();
Serial.println();
Serial.print("Connecting to ");
Serial.print(ssid);
WiFi.begin(ssid, password);
while (WiFi.status() != WL_CONNECTED) {
delay(500);
Serial.print(".");
}
Serial.println("");
Serial.print("WiFi connected, IP address: ");
Serial.println(WiFi.localIP());
if (!client.connected()) {
Serial.print("Reconnecting client to ");
Serial.println(server);
while (!client.connect(clientId, authMethod, token)) {
Serial.print(".");
delay(500);
}
Serial.println("Bluemix connected");
}
}
long lastMsg = 0;
void loop() {
client.loop();
long now = millis();
if (now - lastMsg > 3000) {
lastMsg = now;
float humidity = dht.readHumidity();
float temperature = dht.readTemperature();
String payload = "{\"d\":{\"Name\":\"" DEVICE_ID "\"";
payload += ",\"temperature\":";
payload += temperature;
payload += "}}";
Serial.print("Sending payload: ");
Serial.println(payload);
if (client.publish(pubTopic1, (char*) payload.c_str())) {
Serial.println("Publish ok");
} else {
Serial.println("Publish failed");
}
String payload1 = "{\"d\":{\"Name\":\"" DEVICE_ID "\"";
payload1 += ",\"humidity\":";
payload1 += humidity;
payload1 += "}}";
if (client.publish(pubTopic2, (char*) payload1.c_str())) {
Serial.println("Publish ok");
} else {
Serial.println("Publish failed");
}
}
}


